
The Ultimate Guide to Choosing and Using Drywall Screws for Sustainable Construction
Sustainable construction is not limited to insulation, renewable energy, recycled materials, or energy-efficient building systems. Long-term performance also depends on smaller components that help interior walls and ceilings remain secure throughout their intended service life.
Drywall screws represent only a small part of a wall or ceiling assembly, but incorrect screw selection can lead to damaged gypsum boards, broken fasteners, loose fixings, installation delays, unnecessary material waste, and premature repairs.
Choosing suitable drywall screws for sustainable construction means matching the fastener to the framing material, board thickness, number of layers, environment, and approved installation system. Correct spacing, driving depth, quantity planning, and inspection are equally important.
This guide explains how proper drywall screw selection and installation can support more durable, efficient, and lower-waste interior construction.
Important: Sustainability benefits depend on the complete drywall system, installation quality, service life, maintenance requirements, and compliance with the approved project specification.
For double-layer systems, the outer-layer screw must pass through the combined thickness of both boards before reaching the framing.
A screw suitable for the first layer may be too short for the second layer.
Before selecting the outer-layer fastener, calculate:
- First board-layer thickness
- Second board-layer thickness
- Any intermediate material
- Required framing engagement
Using one screw length for every layer may result in:
- Loose outer boards
- Spinning screws
- Weak fixing points
- Movement during finishing
- Avoidable rework
Quick Answer
A more sustainable drywall installation begins with selecting the correct fastener and preventing avoidable rework.
For better results:
- Use coarse-thread drywall screws for suitable wooden framing.
- Use fine-thread drywall screws for suitable light-gauge metal framing.
- Select screw length according to the complete board build-up.
- Seat the bugle head slightly below the board surface.
- Keep the gypsum-board paper facing intact.
- Follow the approved fixing centres for walls and ceilings.
- Avoid excessive screw length and unnecessary fastening.
- Select the finish according to the intended environment.
- Inspect every fixing before joint finishing begins.
The screw alone does not make a building sustainable. However, correct fastener selection can help reduce defects, extend assembly life, and prevent unnecessary material replacement.
Readers who need a general introduction can first review what drywall screws are, their uses and applications.
What Makes a Drywall Installation More Sustainable?
A sustainable drywall installation should use materials efficiently while maintaining the required level of safety, durability, and performance.
In practical terms, this means reducing avoidable waste during installation and limiting the need for early repair or replacement.
Correct drywall screw selection can help:
- Reduce snapped or stripped screws
- Prevent damage to gypsum-board paper
- Minimize loose board edges
- Reduce installation rework
- Avoid unnecessary fastener use
- Improve consistency across walls and ceilings
- Support longer-lasting interior assemblies
- Improve purchasing and quantity planning
Sustainability should not be used as a reason to reduce the number of screws below the approved requirement. Material efficiency means using the correct fastener quantity and installation method—not simply using fewer screws.
The terminology can also vary between markets. The sheetrock screws vs drywall screws guide explains the commonly used names and the selection factors that still need to be confirmed.
Choosing the Correct Thread Type
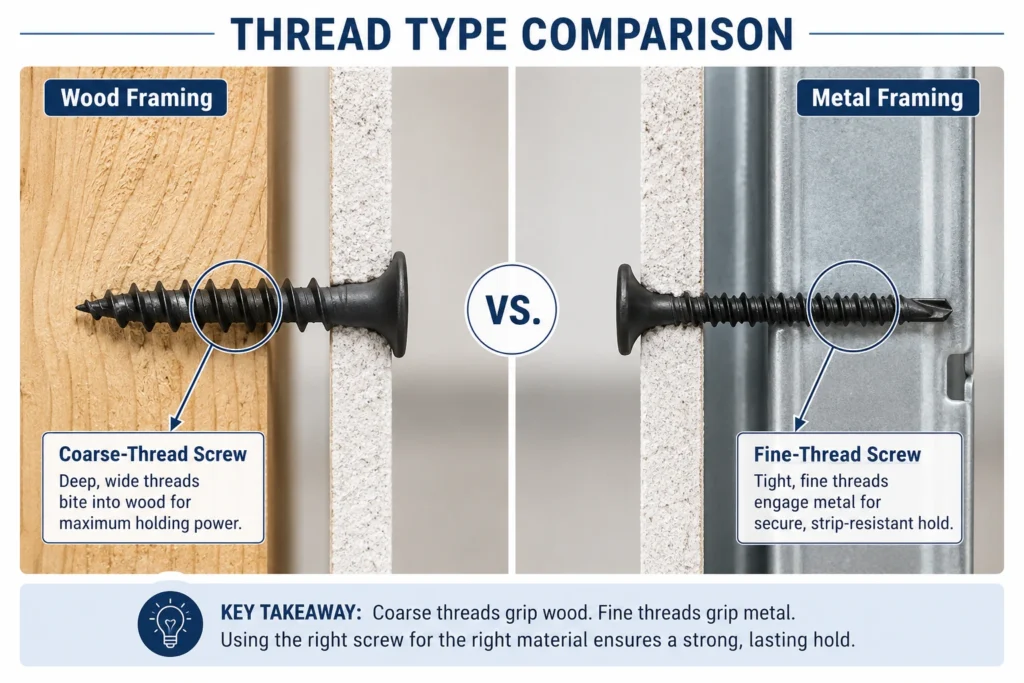
The framing material should be confirmed before selecting a drywall screw.
Coarse-thread screws for wooden framing
Coarse-thread drywall screws have wider and deeper threads designed to engage wood fibres.
They are commonly selected for suitable:
- Wooden studs
- Timber battens
- Timber-framed partitions
- Gypsum board fixed to wooden framing
The deeper thread profile helps the screw grip the timber and pull the board firmly against the framing.
Fine-thread screws for metal framing
Fine-thread drywall screws have closely spaced threads that are generally more suitable for engaging compatible light-gauge metal studs.
They are commonly used for:
- Metal-stud partition walls
- Metal-framed wall linings
- Commercial interior systems
- Suitable lightweight ceiling framing
Using the wrong thread type can result in poor engagement, spinning screws, damaged boards, and unnecessary rework.
Read the detailed fine-thread vs coarse-thread drywall screw comparison before selecting a fastener for wood or metal framing.
It is also important not to confuse drywall fasteners with general timber fasteners. The drywall screws vs wood screws guide explains why the two products are intended for different fastening tasks.
Selecting the Right Drywall Screw Length
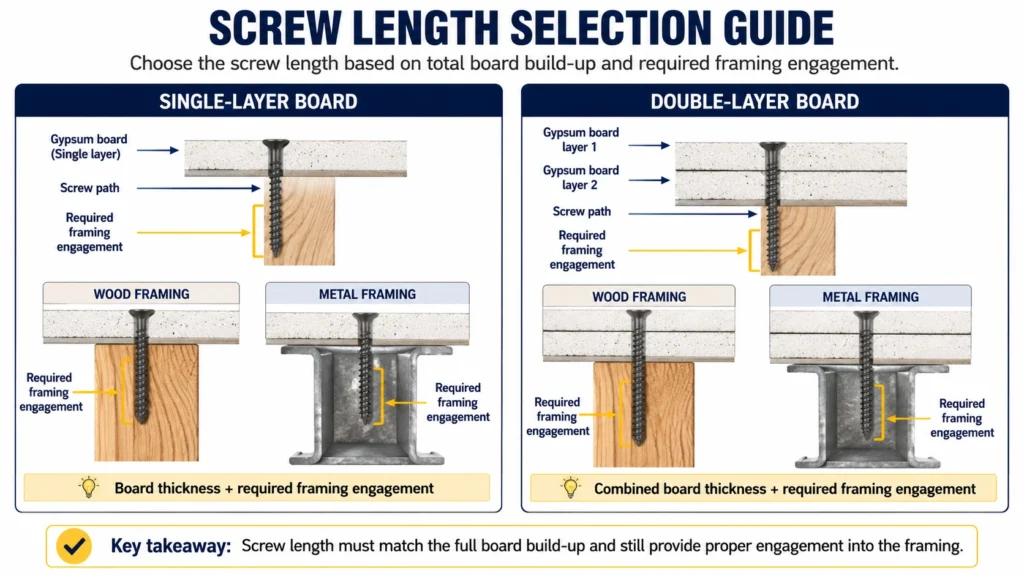
Screw length should be selected according to the complete board build-up, not only the visible board thickness.
Before choosing a length, confirm:
- Thickness of every board layer
- Number of board layers
- Framing material
- Wall or ceiling application
- Any resilient channel or intermediate component
- Required framing engagement
- Approved system requirements
- Location of concealed services
A screw that is too short may not engage the framing adequately.
An unnecessarily long screw may:
- Be harder to control
- Increase installation time
- Increase material cost
- Raise the risk of contacting concealed electrical or plumbing services
- Fail to match the tested or approved system
For practical size selection, review the complete drywall screw size, gauge and length guide.
For broader product dimensions, thread options and technical factors, see the drywall screw sizes, types and specifications page.
Single-layer boards
For a single-layer installation, the screw must pass through the full board thickness and engage the framing according to the approved system.
Confirm:
- Board thickness
- Framing type
- Required penetration or engagement
- Correct screw length
- Screw spacing
- Depth-control setting
Double-layer boards
For double-layer systems, the outer-layer screw must pass through the combined thickness of both boards before reaching the framing.
A screw suitable for the first layer may be too short for the second layer.
Before selecting the outer-layer fastener, calculate:
- First board-layer thickness
- Second board-layer thickness
- Any intermediate material
- Required framing engagement
Using one screw length for every layer may result in:
- Loose outer boards
- Spinning screws
- Weak fixing points
- Movement during finishing
- Avoidable rework
General screw-length framework
| Board Arrangement | Selection Approach |
|---|---|
| Single-Layer Board | Board thickness plus approved framing engagement |
| Double-Layer Board | Combined board thickness plus approved framing engagement |
| Ceiling Board | Use the length specified for the approved ceiling system |
| Assembly with Channels | Include the complete build-up before selecting the screw |
This framework supports planning, but approved system documentation should always take priority.
Why Bugle-Head Design Matters
Drywall screws commonly use a bugle-shaped head.
The curved underside allows the screw head to enter the board surface gradually. When driven correctly, it creates a shallow recess that can be covered with joint compound.
A correctly seated bugle head should:
- Sit slightly below the board surface
- Keep the paper facing intact
- Pull the board firmly against the framing
- Avoid protruding above the finished surface
- Create a clean area for joint finishing
A head driven too deeply can tear the paper and reduce support around the fixing point.
For alternative product terminology and head-design context, see wallboard screws explained.
Coatings, Durability and Corrosion Considerations
Drywall screws may be supplied with black, black-zinc, zinc, or other specified finishes.
The selected finish should match:
- Intended environment
- Storage conditions
- Project specification
- Corrosion-resistance expectations
- Interior exposure conditions
- Approved application
Finish alone does not determine whether a screw is suitable.
Thread type, screw length, material, head design, point geometry, drive type, and system compatibility must also be considered.
Standard drywall screws are generally associated with protected interior applications unless the specific product is approved for exterior or moisture-exposed conditions.
Correct Driving Depth
Driving depth is one of the most important parts of drywall installation.
The screw head should sit slightly below the board surface without breaking the paper facing.
Correctly driven screw
A properly installed screw should:
- Pull the board firmly against the framing
- Create a shallow recess
- Remain below the board surface
- Keep the paper facing intact
- Be easy to cover during finishing
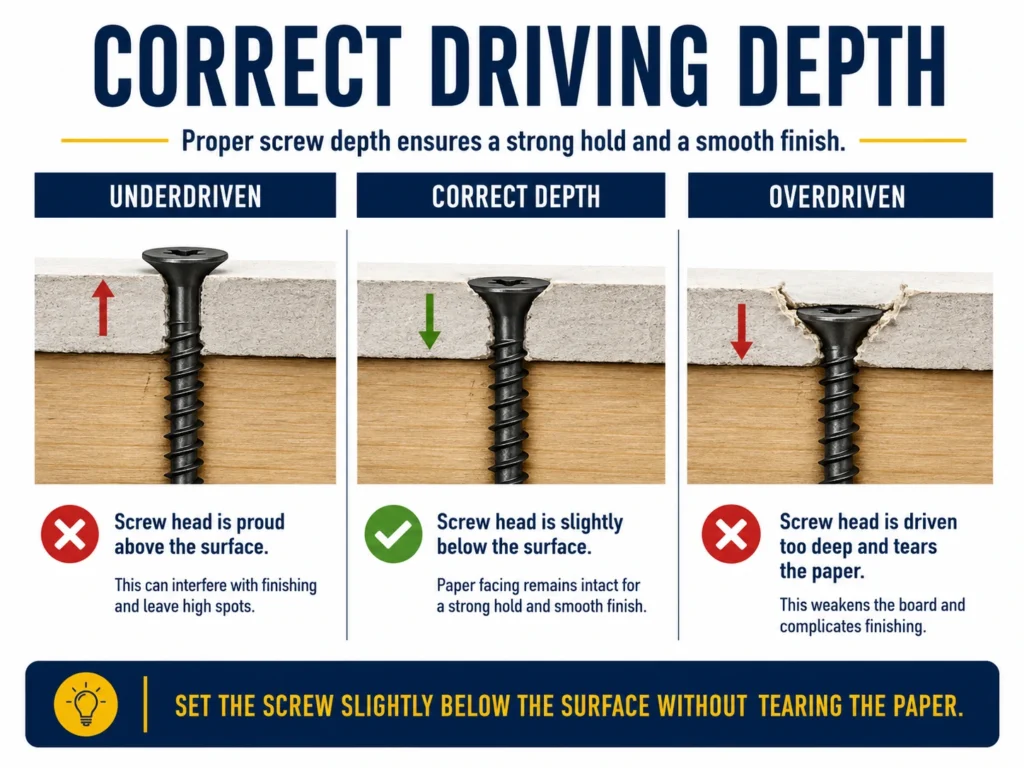
Underdriven screw
A screw that remains too high may:
- Interfere with joint compound
- Remain visible after decoration
- Prevent proper board contact
- Require adjustment or replacement
Overdriven screw
A screw driven too deep may:
- Tear the paper facing
- Enter the softer gypsum core
- Reduce support around the screw head
- Weaken the fixing point
- Require another fixing nearby
The correct result is a controlled recess, not a deep hole.
How to Avoid Damaging the Board Paper
Paper damage is commonly caused by excessive pressure, high driving speed, poor driver alignment, or incorrect depth control.
To reduce the risk:
- Use a drywall screw gun or suitable depth-control attachment.
- Keep the driver perpendicular to the board.
- Avoid excessive driving speed.
- Stop when the correct recess is formed.
- Hold the board firmly against the framing.
- Avoid repeatedly adjusting the same screw.
- Replace badly damaged fixings where required.
A damaged paper surface may weaken the fixing area and create additional finishing work.
Screw Spacing and Material Efficiency
There is no universal screw-spacing rule for every drywall system.
Spacing may vary according to:
- Wall or ceiling application
- Board thickness
- Board orientation
- Stud spacing
- Single-layer or multi-layer construction
- Board-edge and field locations
- Fire-rating requirements
- Acoustic requirements
- Impact-resistance requirements
- Manufacturer instructions
- Local standards
If screws are spaced too far apart, the board may move or fail to remain firmly supported.
If screws are installed unnecessarily close together:
- Board edges may be damaged.
- Timber framing may split.
- Labour and fastener use may increase.
- Installation time may increase.
- The installation may still fail to match the approved fixing pattern.
Material efficiency means using the required number of screws in the correct positions.
Wall and Ceiling Fixing Differences
Walls and ceilings should not automatically use the same fixing pattern.
Wall installations
In wall systems, the board is supported vertically by the framing.
Important considerations include:
- Stud alignment
- Board-edge support
- Screw spacing
- Joint layout
- Correct head depth
- Framing engagement
Ceiling installations
Ceiling boards are installed overhead and remain subject to gravity.
The approved ceiling system may require:
- Closer fixing centres
- Different screw lengths
- Additional temporary board support
- Careful joist or batten alignment
- More consistent depth control
- A different installation sequence
Always follow the approved ceiling specification rather than adapting a wall fixing pattern.
How Proper Fastener Selection Reduces Waste
Incorrect fasteners can create several forms of avoidable construction waste.
Examples include:
- Snapped screws
- Stripped drive recesses
- Spinning screws
- Damaged board paper
- Loose board edges
- Incorrectly fixed board sections
- Replacement boards
- Additional joint compound
- Delayed finishing
- Labour rework
Selecting the correct screw before installation can reduce these problems.
Good planning should include:
- Confirming the framing material
- Measuring the complete board build-up
- Selecting the correct thread type
- Choosing the correct screw length
- Confirming the approved fixing pattern
- Ordering an appropriate size mix
- Inspecting the framing before boarding
- Testing driver depth before full installation
A small amount of preparation can prevent a larger amount of waste later.
How Durability Supports Sustainable Construction
Durability is an important part of sustainable building performance.
A wall or ceiling that remains secure for longer may require fewer repairs, fewer replacement materials, and less maintenance work.
Drywall durability depends on the complete system, including:
- Framing quality
- Board selection
- Screw suitability
- Fixing pattern
- Installation technique
- Environmental conditions
- Joint finishing
- Building movement
- Maintenance
The fastener is only one component, but a poorly selected or incorrectly driven screw can reduce the performance of the entire assembly.
Common Drywall Screw Installation Mistakes
Using the wrong thread type
Coarse threads are generally associated with suitable wooden framing, while fine threads are more commonly selected for compatible light-gauge metal studs.
Choosing a screw that is too short
A short screw may pass through the board without engaging the framing adequately.
Using excessive screw length
An unnecessarily long screw may be harder to control and increase the risk of contacting concealed services.
Missing the framing member
A screw driven beside the stud does not create a secure board-to-frame fixing.
Driving at an angle
Angled driving can reduce engagement, damage the paper, and leave part of the screw head exposed.
Overdriving
Breaking the paper facing reduces support around the screw head.
Underdriving
A raised screw head can interfere with joint finishing.
Applying one spacing rule everywhere
Walls, ceilings, single-layer boards, and multi-layer systems may require different fixing centres.
Ignoring framing condition
Split timber, bent metal studs, poor alignment, or loose framing can lead to defects even when the correct screw is used.
Finishing before inspection
Loose, raised, missed, or overdriven screws should be corrected before joint compound is applied.
Wood-Framing Considerations
Timber framing introduces additional factors that can affect drywall performance.
Wood can expand, shrink, twist, or move as moisture conditions change.
To reduce installation problems:
- Use properly conditioned timber.
- Reject badly split or twisted studs.
- Align framing before boarding.
- Keep screws away from damaged edges.
- Hold the board firmly against the stud.
- Use the correct screw length.
- Avoid overdriving.
- Inspect the wall before finishing.
Timber movement can contribute to visible screw heads or screw pops later.
Metal-Framing Considerations
Light-gauge metal framing requires a screw that can engage the metal profile correctly.
Before installation, confirm:
- Metal thickness
- Stud profile
- Board thickness
- Number of board layers
- Screw thread type
- Screw length
- Approved fixing pattern
A screw suitable for one light-gauge system should not automatically be assumed suitable for every metal profile.
How to Reduce Screw Pops
Visible screw heads can be caused by more than one issue.
Possible contributors include:
- Timber shrinkage
- Framing movement
- Poor board contact
- Inadequate screw engagement
- Overdriving
- Missed studs
- Incorrect screw length
- Poor framing alignment
- Finishing over defective fixings
To reduce the risk:
- Inspect and align framing.
- Use the correct screw type and length.
- Hold the board firmly against the framing.
- Achieve adequate engagement.
- Avoid tearing the paper.
- Follow approved fixing centres.
- Correct defects before finishing.
A visible screw head is often a symptom. The underlying cause should be identified before cosmetic repair.
Estimating Screw Quantity Without Creating Excess Waste
The number of screws required depends on:
- Board dimensions
- Stud or joist spacing
- Approved fixing centres
- Board orientation
- Wall or ceiling use
- Number of board layers
- Openings and perimeter details
- Reasonable purchasing allowance
Avoid using one fixed quantity for every sheet.
Calculate the framing lines behind each board, apply the approved fixing centres, and then add a reasonable allowance for dropped or damaged screws.
For a practical calculation method, read how many drywall screws are needed per sheet.
Sustainable Purchasing Checklist
Before ordering drywall screws, confirm:
| Check | Why It Matters |
|---|---|
| Framing Type | Determines the suitable thread pattern |
| Board Build-Up | Determines screw length |
| Wall or Ceiling Use | Affects the fixing pattern |
| Head Design | Supports correct board seating |
| Finish | Must suit the intended environment |
| Quantity | Helps reduce shortages and excess stock |
| Size Mix | Supports different board assemblies |
| Storage | Helps protect fasteners before installation |
| Approved System | Confirms final compatibility |
For general supplier evaluation, review the drywall screw supplier guide.
Bulk and international buyers can also review the drywall screw exporter checks and the drywall screw supplier in India guide.
For available product sizes and packaging options, visit the Screwbee drywall screw products page.
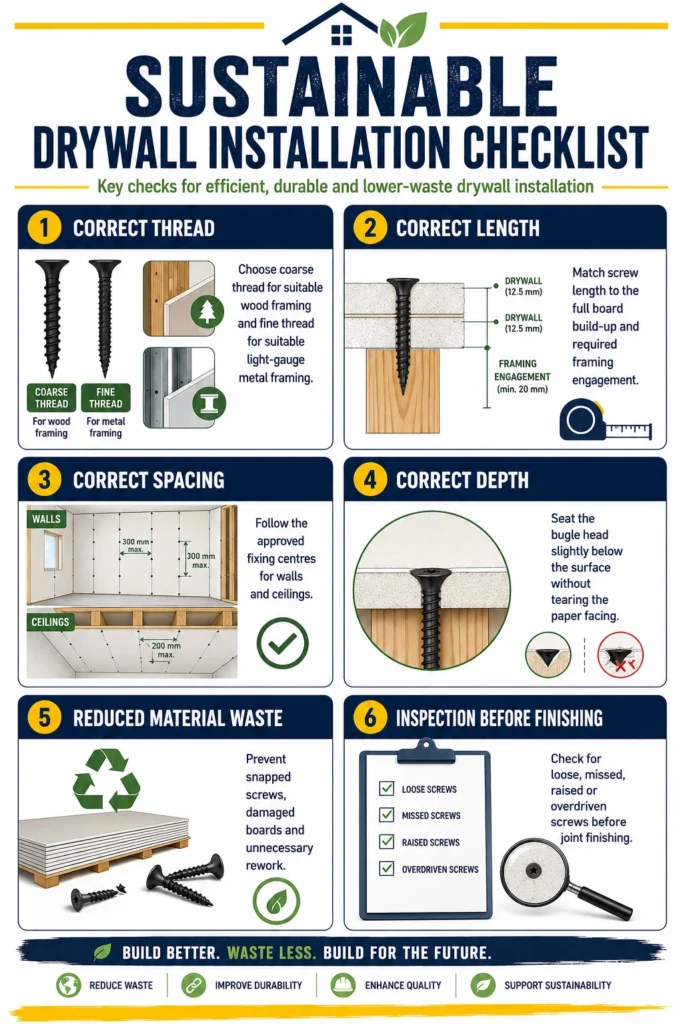
Installation Checklist
Before starting work, confirm:
- Framing is correctly aligned.
- Board thickness is known.
- Number of layers is confirmed.
- Correct screw type is available.
- Screw length matches the board build-up.
- Stud or joist positions are marked.
- Driver depth is adjusted.
- Board is held firmly against the framing.
- Approved fixing centres are available.
- Concealed services are identified.
- Installed screws will be inspected before finishing.
Frequently Asked Questions
What makes drywall screws more sustainable?
The screw itself is not automatically sustainable. Correct selection and installation can help reduce breakage, board damage, rework, and premature repairs.
Which thread type should be used for wooden studs?
Coarse-thread drywall screws are commonly selected for suitable wooden framing because their wider and deeper threads engage wood fibres effectively.
Which thread type should be used for metal studs?
Fine-thread drywall screws are generally more suitable for compatible light-gauge metal framing.
How should screw length be selected?
Calculate the complete board build-up and add the framing engagement required by the approved system.
Can the same screw be used for single-layer and double-layer boards?
Not automatically. Double-layer systems have greater thickness and may require longer outer-layer screws.
How deep should the screw head sit?
The bugle head should normally sit slightly below the board surface without tearing the paper facing.
Can wall screw spacing be used for ceilings?
Not automatically. Ceiling systems may require different fixing centres and screw lengths.
Does using fewer screws make an installation more sustainable?
No. Using fewer screws than required may reduce performance and increase the risk of repair. Sustainability means using the correct quantity in the correct positions.
Can standard drywall screws be used outdoors?
Standard drywall screws are generally intended for protected interior applications unless the product is specifically approved for exterior or moisture-exposed use.
How can drywall installation waste be reduced?
Confirm framing type, board thickness, screw length, thread type, spacing, driver depth, and material quantities before installation.
Conclusion
Choosing suitable drywall screws for sustainable construction involves more than selecting a fastener by size, finish, or price.
The installer or buyer must consider:
- Framing material
- Board thickness
- Number of layers
- Screw thread type
- Screw length
- Bugle-head design
- Driving depth
- Screw spacing
- Finish requirements
- Framing condition
- Wall or ceiling application
- Approved system documentation
Correct screw selection can help reduce damaged boards, broken fasteners, installation delays, loose fixings, premature repairs, and unnecessary material waste.
The most sustainable approach is not to use the fewest screws or the cheapest fastener. It is to use the correct product, in the correct quantity, installed according to the approved system, so the drywall assembly can perform reliably for as long as intended.
For project specifications, bulk supply, or product enquiries, contact Screwbee.